In this post, we’ll be looking at how you can send emails to your contacts using Formilla. You can send email messages to thousands of your contacts to announce company news, offer a sale or promotion, share your most recent blog post, and so much more.
There will be a couple of things you’ll need to set up first and this post will guide you on how to do this. We’ll be covering 3 key areas:
- Setup your business email domain
- Create an email message
- Send (or schedule) your email message
Note: Email messaging is a feature available in the Growth plan, as well as the 15-day trial. If you’re using Formilla with the Wix platform, this feature is not supported.
Setup your business email domain
To send email messages via Formilla, we need to verify you are using a valid “From” email address with a business domain that you can access. This helps keep your campaigns out of spam folders and protects your reputation by ensuring others can’t use your domain without permission.
Let’s get started.
- Mouse over “Automation” from the left-hand menu, then click on “Smart Messages”. Click the “New Email” button as shown.

- A message bar will display at the top of the following page with a link to “add your email domain”. Click the link to proceed.

- Follow the steps listed on the next page to add and verify your domain.
Note: this step requires you to make a few simple changes to your DNS settings to allow Formilla to send email on behalf of you. Contact us at [email protected] if you’re unsure how to proceed.
Create an email message
In this step, we’ll look at creating an email message and highlight several different options you have.
To get started:
- Click “Smart Messages” from the left-hand menu.
- Click the “Create Smart Message” button, and select “Email Message” from the fly-down menu as shown. Assuming you verified your email domain successfully in the previous section, the message bar at the top of the page should no longer display.
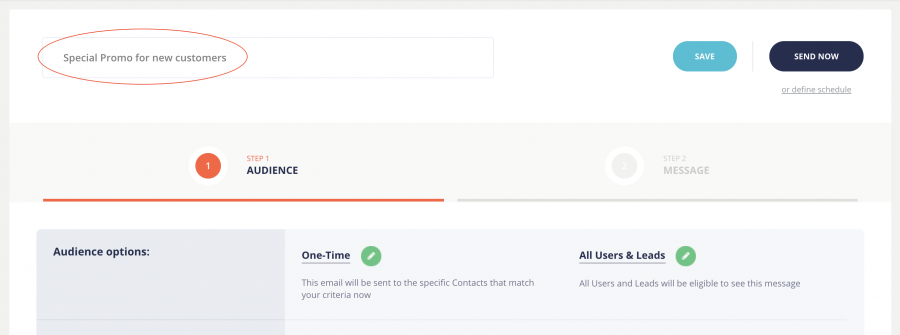
- Give your email campaign a name in the “Name your email” box. This is simply an internal name for you to recognize the message later from the Smart Messages page. Example: “My first Formilla email”, or “Special Promo for new customers”.
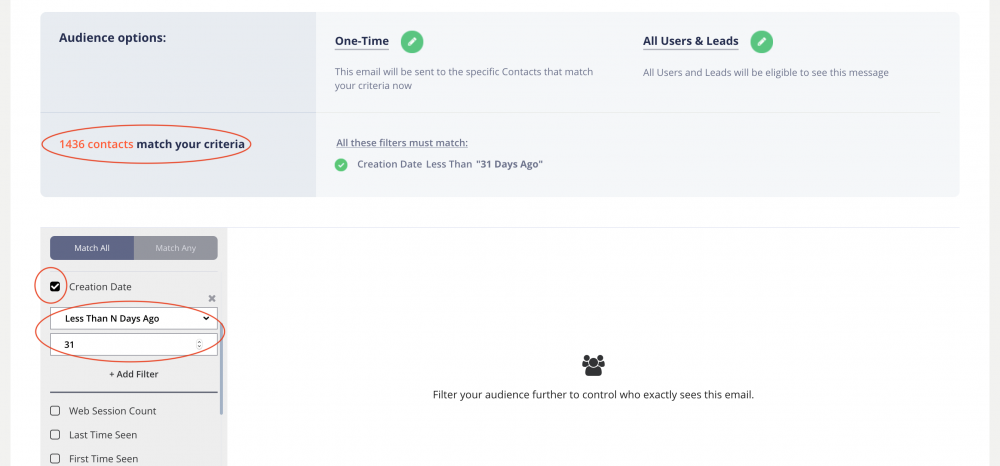
Step 1 – Audience tab
The Audience section is where we will choose our contacts, and narrow the focus of this email campaign. Continuing with our previous example, let’s assume we want to create a one-time “Special promo for new customers”.
To do this, we’ll configure our Audience options as follows:
- Ensure the default “One-Time” option is selected, as this is a one-time email for new customers (Contacts) that match our criteria right now. We’ll briefly touch upon how the “Automatic” option works later in this post as well.
- Ensure the default “All Users & leads” option is selected. This will include the following two sets of contacts together:
- My Users – these are contacts that you have integrated with Formilla (for example, logged-in users on your website). To learn about integrating your data with Formilla, it takes some programming via our JavaScript and REST APIs.
- Formilla Leads – contacts that have had a conversation with you via live chat are designated as leads at first. Basically someone that might be interested in your products or services.

- Next, we’ll filter our contacts to include only customers with a “Creation Date” within the last month since we’re wanting to target new-ish customers. Simply check the box next to “Creation Date“, select “Less Than N Days Ago“, and enter 31. This means contacts that were created “less than 31 days ago”.
The matching number of contacts dynamically updates in the circled area as you add additional filters (not covered in this example).
 Now that we have our Audience defined, let’s click over to Step 2.
Step 2 – Message tab
In this step, we will compose our email message, give it a subject line, and more. Let’s go:
- Select the “Step 2 – Message” tab at the top of the page if you haven’t already.
- Choose your “From” email from the dropdown; this is the email name and email address your customers will see in their inbox. Such as “Tom at My great Business, LLC”. It’s best to use a name/email address that your customers will recognize.
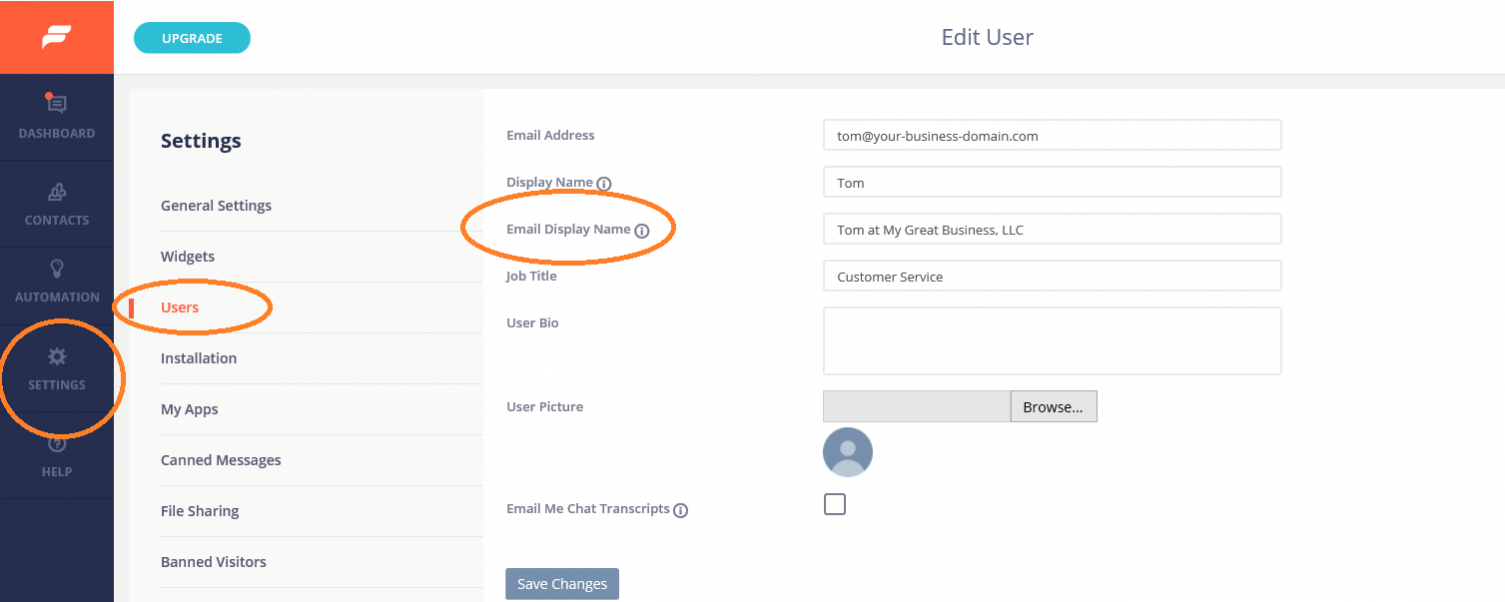
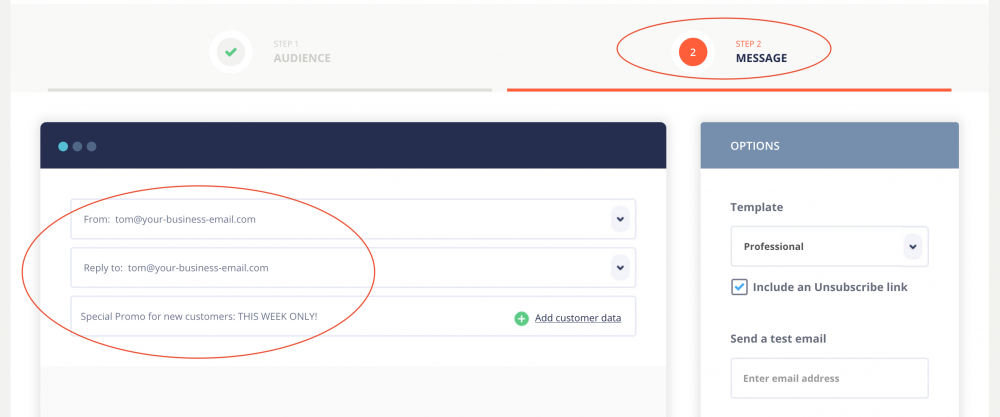 Note: you can only select the “From” email in this step. To modify how the name displays, you’ll need to do so from the “Settings” –> “Users” page. The field is called “Email Display Name“. This is what it looks like, but let’s not worry about it here, as we will be forced to exit our message and lose our progress.
- Now choose a “Reply to” email address; this is where customer replies will go. You can use the same email as the “From” address you chose, or if you’re sending emails from an email such as “[email protected]”, and want replies to go to your #1 sales gal, Melissa, you may choose Melissa’s email as the reply email.
Note: the user must exist in your Formilla account to see them listed in the From or Reply to dropdowns.
- Next, we will give our message a subject line. For example, “Special Promo for new customers: THIS WEEK ONLY!”
- Now onto the fun stuff. Let’s compose our message in the editor. First, you can choose from the “Professional” or “Personal” templates from the dropdown on the right.
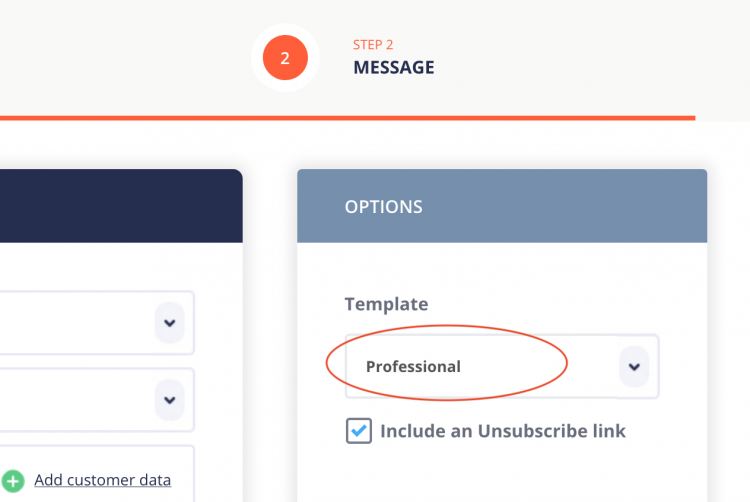
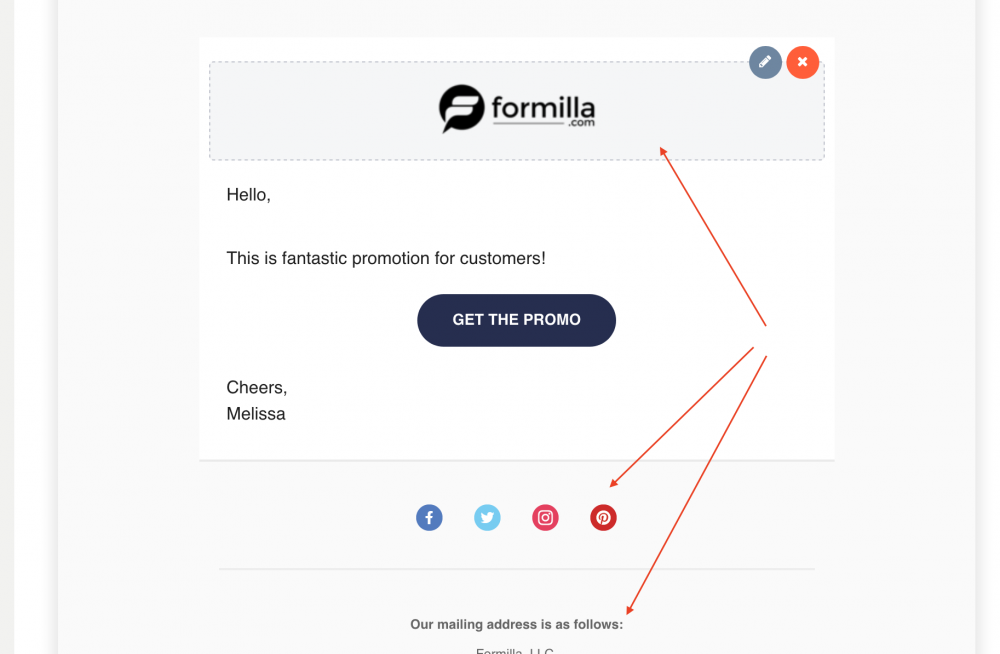
- In this example we’ll stick with the Professional template. You can upload a Company logo, social links, and update your company address by mousing over and clicking inside each corresponding section.
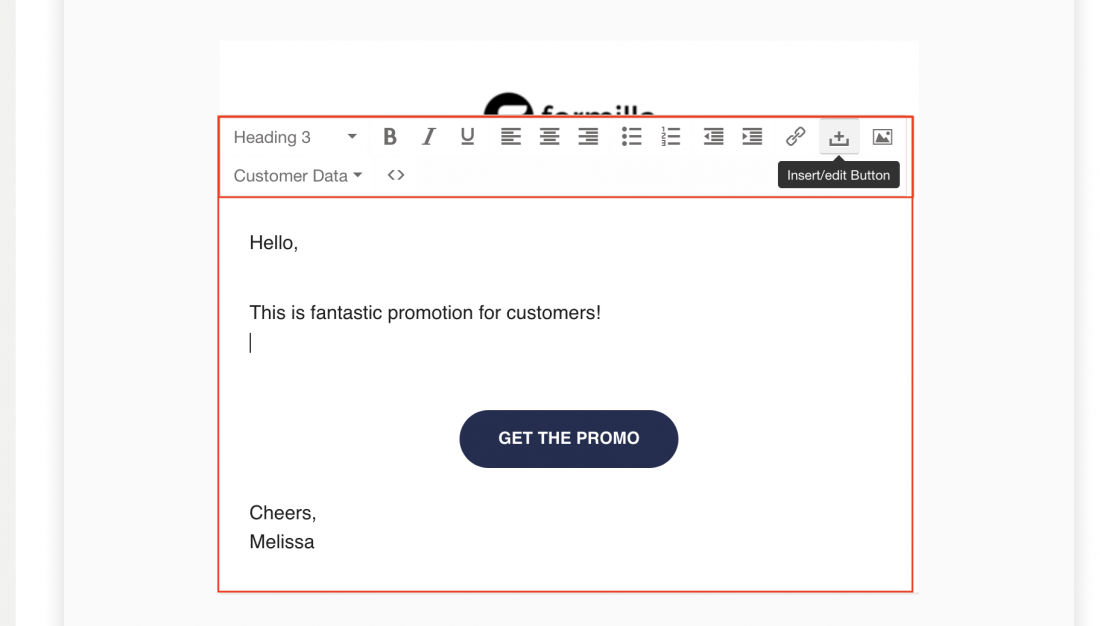
- To compose your message, click in the editor area, and you’ll see a toolbar appear. You can bold or italicize text, insert a custom button, link, image, & more. You can also dynamically include “Customer Data” from the toolbar dropdown with the same name. This is useful to personalize your messages, such as “Hey Tom“. We won’t get into the details in this post, however.
 Now that we’ve composed our message, let’s “Save” in the top right corner to make sure our changes are not lost.
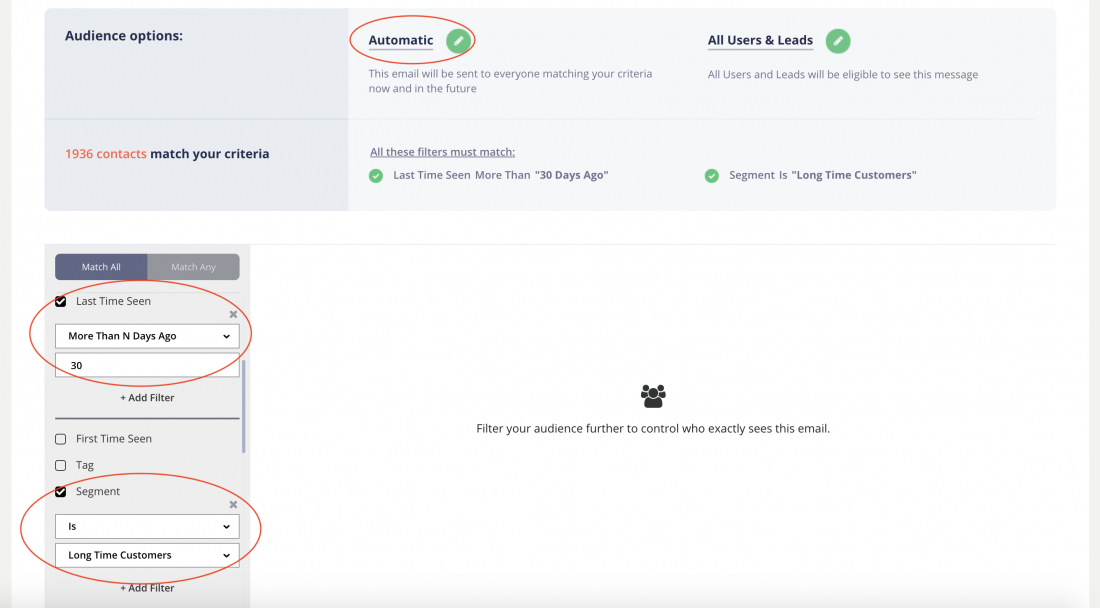
Quick note about “Automatic” emails
Recall above, we set the Audience options to “One-time”, as we wanted to send this message to a specific set of contacts that match our conditions right now. With “Automatic”, we can create automated emails that get sent as contacts meet certain conditions now, and in the future. This is an example of one of the most popular forms of marketing automation.
For example, you can setup an automatic email campaign based on:
- A segment or tag, such as “VIP customer”,”follow-up”, “high quality lead”, “big spender”, “signed up 7 days ago”, etc.
- Contacts with “Last Time Seen” date of more than 30 days ago (to encourage them to come back).
- Custom attributes you have integrated inside of Formilla that pertain to your business, such as “Premium customer” if you offer a product or service subscription (like we do).
Send (or schedule) your email message
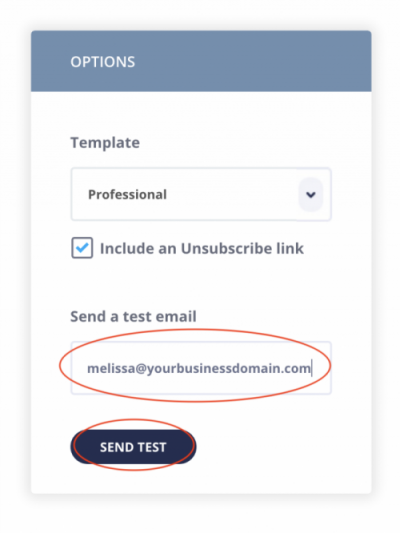
Before we send the email message to our contacts, let’s send ourselves a test email just to make sure everything looks good.
The editor gives us a good idea of what the email will look like, although by sending a test we can verify our From and Reply to emails display correctly, links go to the correct website(s), if included, and also our social and company information is perfect.
- Enter a test email address in the right-hand side of the page and click “Send Test“. You should receive it momentarily, with the prefix “[Test]” in the subject line. Be sure not to click “Send Now” at the top, as this will fire the email to your contacts prematurely 🙂
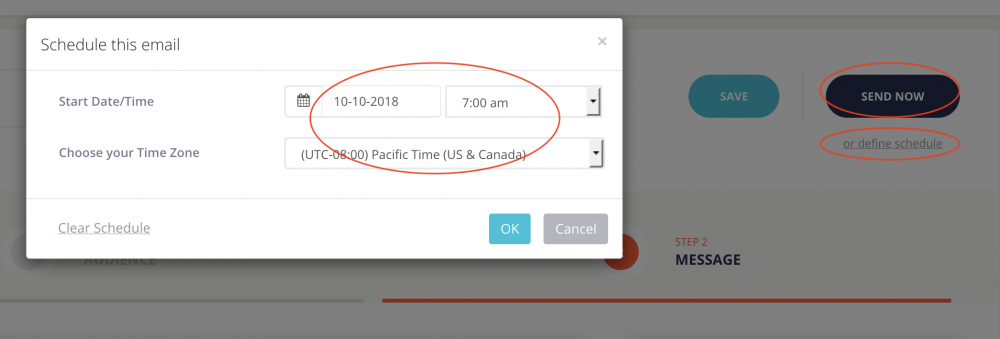
- Once you’ve verified your email and made any necessary adjustments, simply click “Send Now” in the top right corner.
If you prefer to schedule your email to go out at a later date, click the “or define schedule” link and pick a date and time, desired timezone, followed by clicking “OK” when finished.
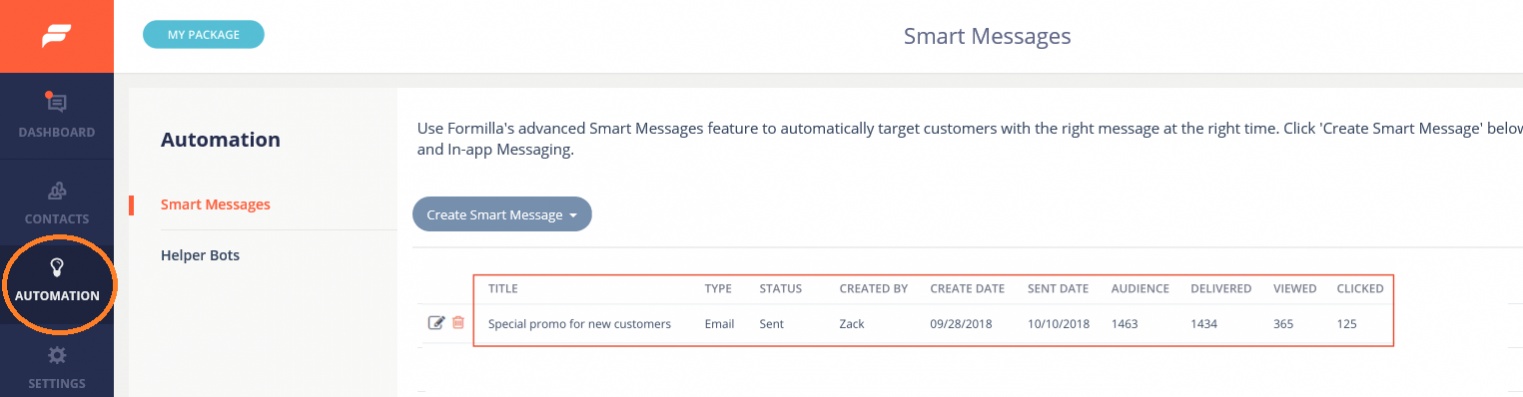
- That’s it! You’ll see a quick confirm popup just to make sure you’re sending your email to the correct number of contacts; simply review and confirm. You can track your email statistics from the Smart Messages page thereafter (delivered, opened, clicked, etc.).
Happy emailing 🙂
