Chat Departments are a feature that can be used to control which agent a chat is routed to. An incoming chat will only alert agents assigned to the Department that is being reached. Agents who are not a part of the Department that is being contacted will not be alerted, nor will they see the incoming chat as one that is available to accept. This is a great feature to use if you want to help ensure the right person is responding to a particular chat.
In this tutorial we will discuss a few different ways to utilize the Departments feature. We will cover setting up Department selection as a Pre-Chat Field to allow visitors the option to choose the appropriate department. We will then go over how to configure Departments so that chats are routed based on the page the visitor starts a chat on. Setting up a contact page that has a separate link for each Department or Contact that is available to chat with will also be mentioned.
Note: You can still transfer a chat to any other agent who is currently online, regardless of what department they are in.
Creating Departments and Assigning Users
- You need to have more than one user created before Departments can be created. Mouse over Settings and click on Users, then click on Add User if needed to create additional users.
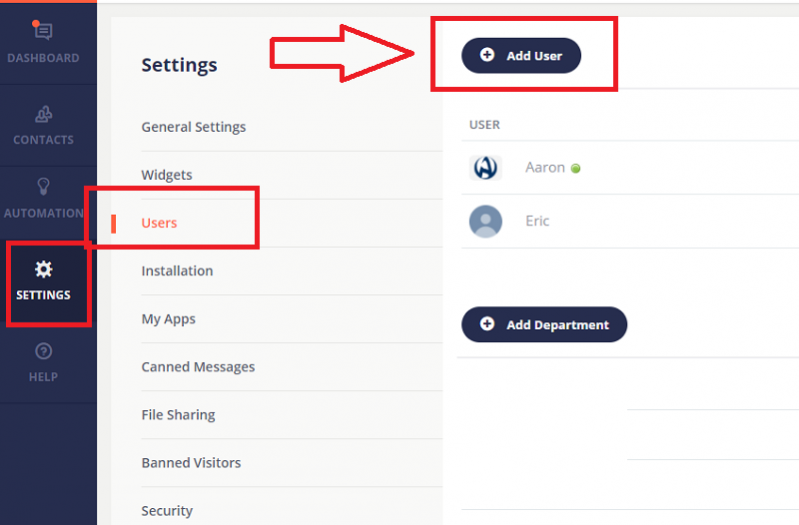
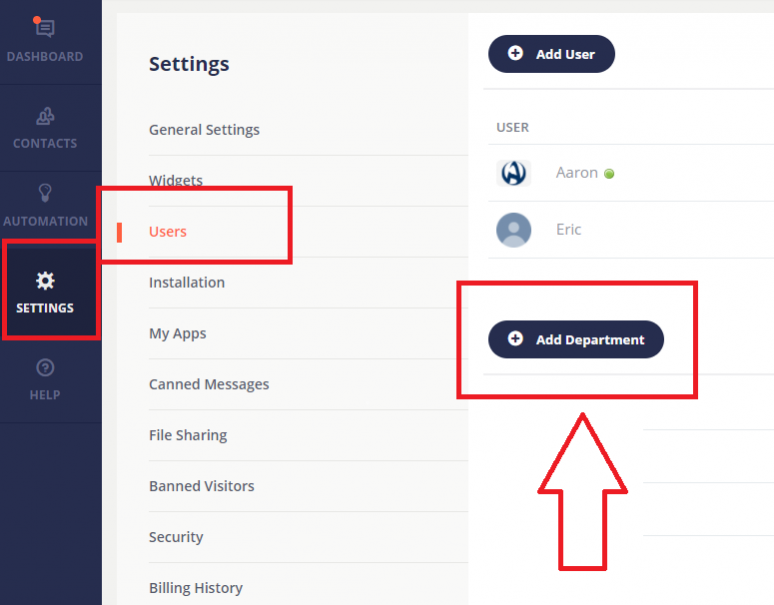
- Create a department by mousing over Settings, clicking on Users, then clicking on Add Department.
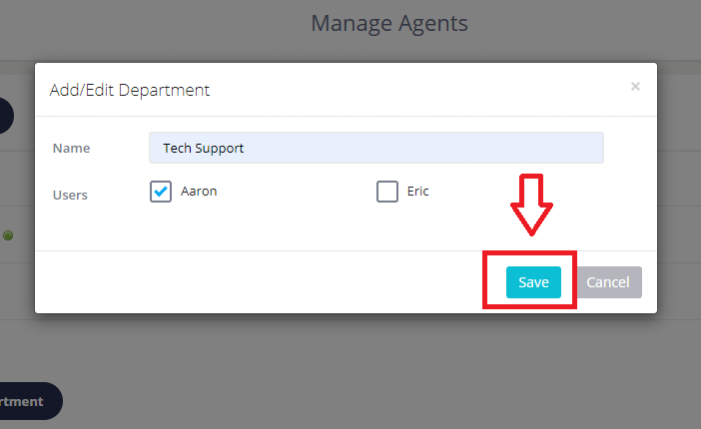
- Create a name for your Department and assign the Users that will answer chats for that Department. Keep in mind that the Department name is seen by the visitor if you are going to use drop-down menu selection to choose a Department. Click on Save when finished.
- Repeat the previous steps for additional Departments until you have created all the Departments you will need.

You now have your departments created and ready to use. Now we will discuss some different ways to use these departments.
Departments as a Pre-chat Field Menu
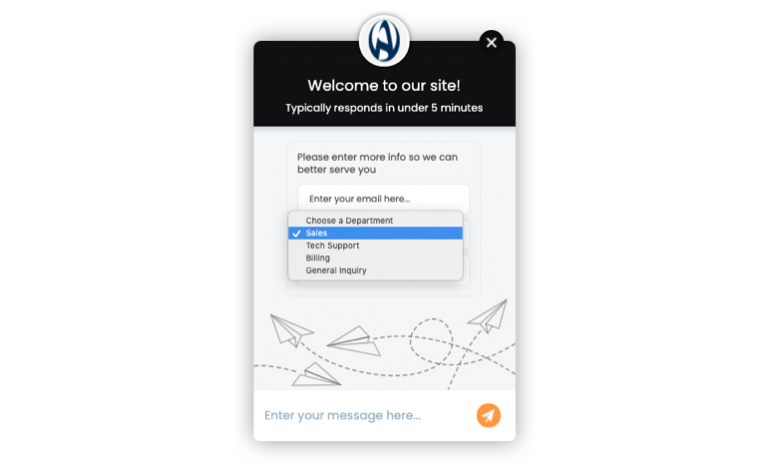
This option is used if you want your website visitors to see a drop-down menu to select the appropriate department prior to starting a chat.
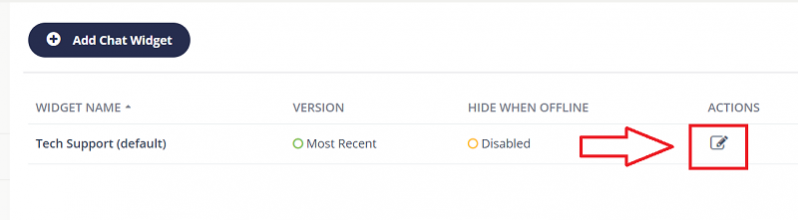
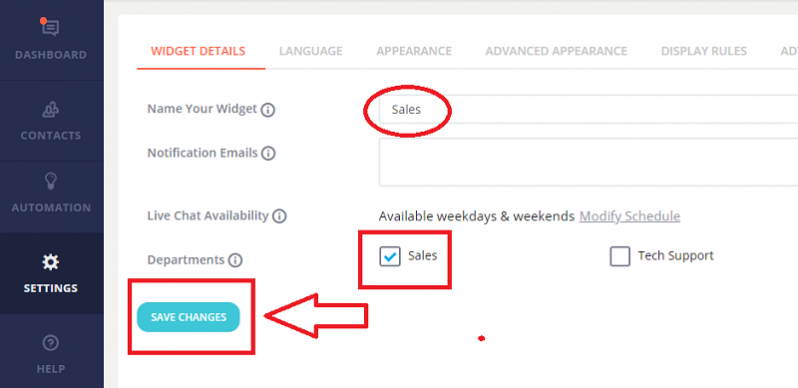
- Mouse over Settings and click on Widgets, then click on the pencil/edit icon next to the widget you want to add a Departments menu option to.
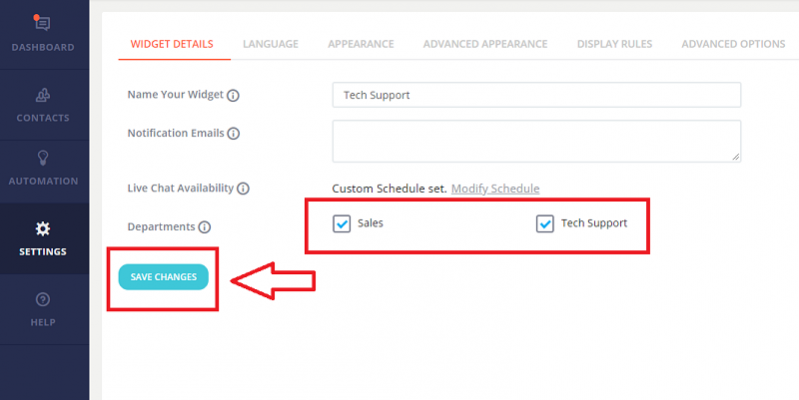
- In the Widget Details section, check the box next to all departments that you want to show up as a menu selection for visitors to choose from, and click Save Changes.
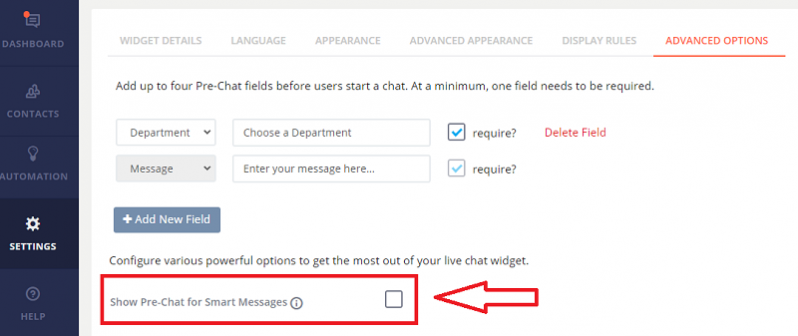
- Click on Advanced Options. In this section, click on Add New Field and select Department from the drop-down menu. Check the box next to “require?” if you want all visitors to select a department before beginning a chat. If you do not make Department selection required and a visitor starts a chat without making a selection, the incoming chat is broadcast to all online users.

- Check the box next to “Show Pre-Chat for Smart Messages” if you are using a chat Smart Message and you want the field to appear when a Smart Message is clicked on to start chatting.
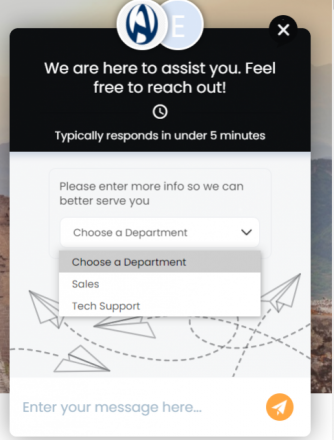
When your visitor clicks on the chat button to chat with you, they will now have a Departments drop-down menu to choose who they are trying to reach.
Departments Based on Web Page
This option is used if you want the Department receiving the chat to be determined by the web page that the visitor is on. Current packages allow you to install on multiple websites starting with the Professional package. You want to use this option if you have one account answering chats for multiple websites, but you want each user to only answer chats for one of your websites.
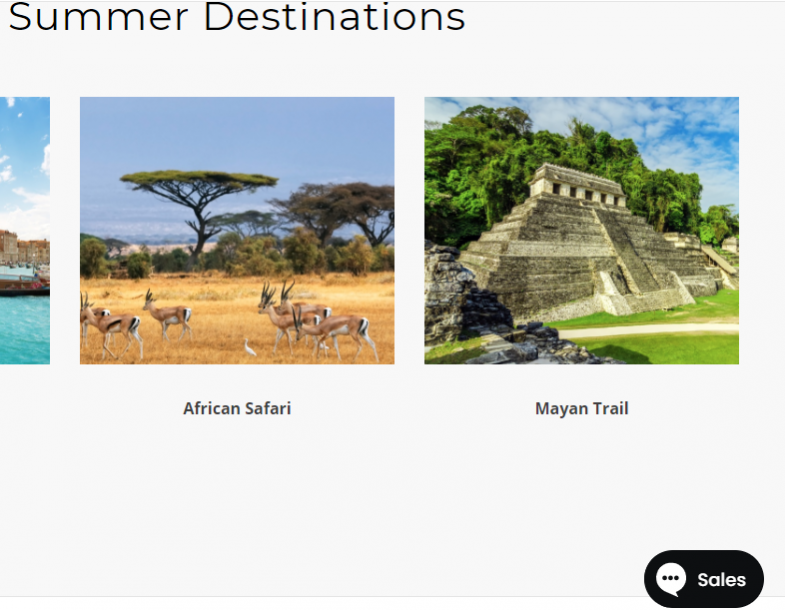
You can also use this option if you want chats routed based on different pages of the same site. For example, you can have chats coming from a support or help page route to a Tech Support Department, and chats from Product pages going to a Sales department.
- Add a widget for each department by mousing over Settings and clicking on Widgets, then clicking on Add Chat Widget. You can use the default widget as one of your widgets as well, just click the pencil/edit icon next to the default widget to edit it.
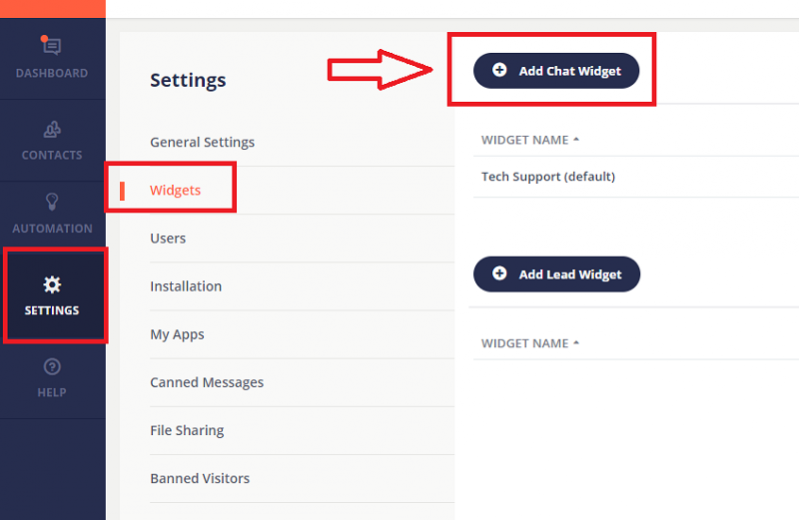
- In the “Departments” section, check the box for the department that you want to be answering chats from this department. It is recommended that you name the widget like the department that is answering it to make sure you can easily find the correct widget when needed. Click on Save Changes when done.

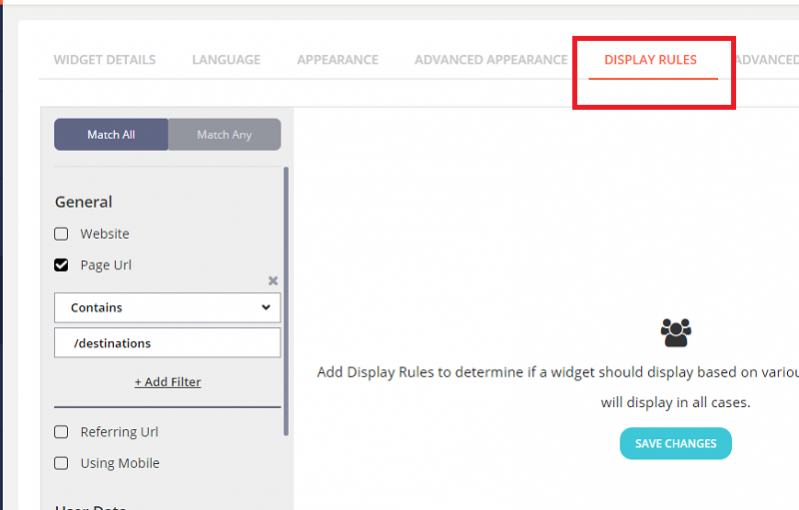
- Set up appropriate Display Rules to ensure each widget is displaying where needed by going to the Display Rules tab. The Display Rule can specify a specific website for the Widget to appear on if you are answering multiple websites, or you can set rules for the specific page in a given site that the widget is to appear on. Please see our Display Rules article for more help with Display Rules.
- If you want the customer to easily see that they are reaching different departments in the same website, you can change the Chat Button text. You can change the Chat Button text by going to the Language section and editing the Chat Button field and the various other button text fields.

For example, you can have the button on one page read “Tech Support” and the button on another page read “Sales” and so on. The visitor will then be routed to the appropriate department based on the particular page that they are on when they begin a chat.
Departments From the Same Contact Page
This option is used if you want to have a variety of options listed on the same page that a visitor can click on to determine who they are talking to. This can be a variety of organizational departments, a list of vendors or speakers who are available to chat at a virtual event, or for any other situation where you want multiple points of contact linked to from the same page.
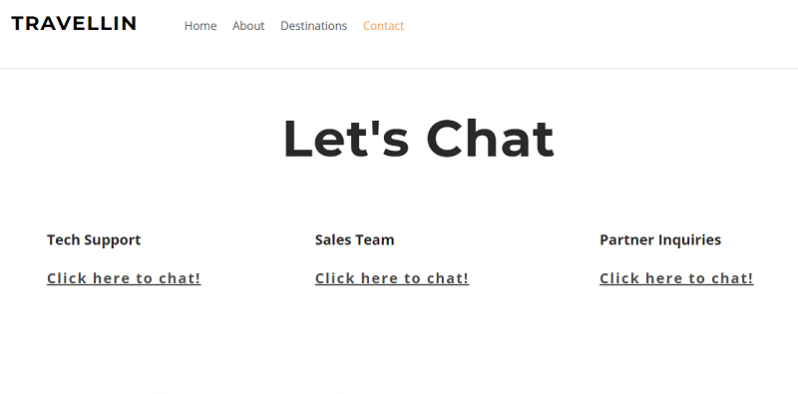
In this scenario, you would use the Direct Link feature to have a button or link pull up the chat window for the appropriate party. In the example website picture above, clicking on the link under Tech Support will start a chat routed to just the users in the Tech Support department, clicking on Sales Team will route to the Sales department, and so on. For more information about this feature, please see our Direct Link article.
- Add a widget for each department by mousing over Settings, clicking on Widgets, then clicking on Add Chat Widget.
- In the “Departments” section, check the box for the department that you want to be answering chats from this department. It is recommended that you name the widget like the department that is answering it to make sure you can easily tell which department the widget applies to. Click on Save Changes when done.
- Find the appropriate link information for a given department by mousing over Settings, clicking on Widgets, clicking on the pencil/edit icon next to the widget, selecting the Advanced Appearance tab, and clicking on Live Chat Links. Each widget will have unique Direct Link info that you would use for the appropriate link or button on your website.
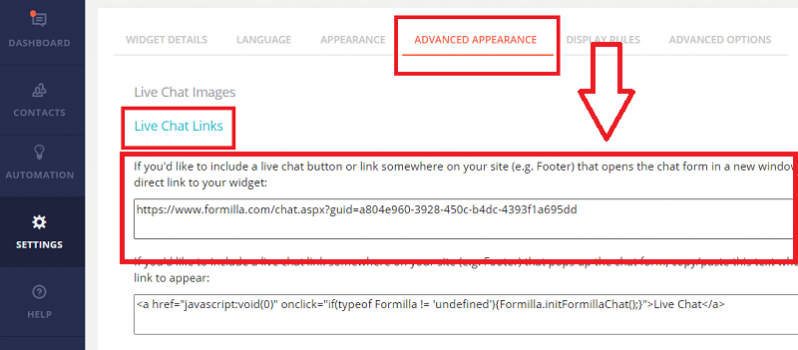
The link you find in the field outlined in the picture is the only recommended way to have multiple department or vendor links in the same page. Only one inline widget can exist per page. For this reason, if you are using the same page for multiple contacts then each link should open a chat window in a new tab.
As always please feel free to contact us at [email protected] if you have any trouble setting up your Departments or if you have any other questions!