You can integrate contact data -named Contact Attributes by Formilla- about your logged-in customers such as User ID, email, first name, last name, phone and signed up date with your Formilla account by using our JavaScript API.
Formilla also lets you pass custom data -named Contact Custom Attributes– about your customers giving you the ability to track important properties about them such as the plan someone is on, how much money they had spent in the last month, among others.
This post will give you an overview and guide you on how to accomplish this integration.
Note: if you’re using Formilla with a Wix website, the Formilla JavaScript API is not supported.
On the following code snippet you can see an example of the contact and custom attributes.
(function () {
	var head = document.getElementsByTagName("head").item(0);
	var script = document.createElement("script");

	var src = (document.location.protocol == 'https:'
		? 'https://www.formilla.com/scripts/feedback.js'
		: 'http://www.formilla.com/scripts/feedback.js');

	script.setAttribute("type", "text/javascript");
	script.setAttribute("src", src); script.setAttribute("async", true);

	var complete = false;

	script.onload = script.onreadystatechange = function () {
		if (!complete && (!this.readyState
			|| this.readyState == 'loaded'
			|| this.readyState == 'complete')) {
		    complete = true;
		    Formilla.guid = 'cscd537a-4a00-4007-ab78-c3f3b17a730a';

		    // Contact attributes
		    Formilla.contactAttributes = {
			UserId: "100",                       // Contact Id as string
			Email: "[email protected]",     // Contact email address
			FirstName: "Mike",                   // Contact first name
			LastName: "Thompson",                // Contact last name
			Phone: "343111685",                  // Contact phone
			SignedUp_date: 1523354400            // Signed up date as a unix timestamp
		    };

		    // Contact Custom Attributes
		    Formilla.contactCustomAttributes = {
			"Account Number": 15621,             // Number
			"Plan Name": "Premium",              // String
			"Average Purchased Monthly": 1647.9, // Decimal
			"Last Purchase_date": 1524757984,    // Date as a unix timestamp
			"Is Manager": true                   // Boolean
		    };


		    Formilla.loadWidgets();
		}
	};

	head.appendChild(script);
})();
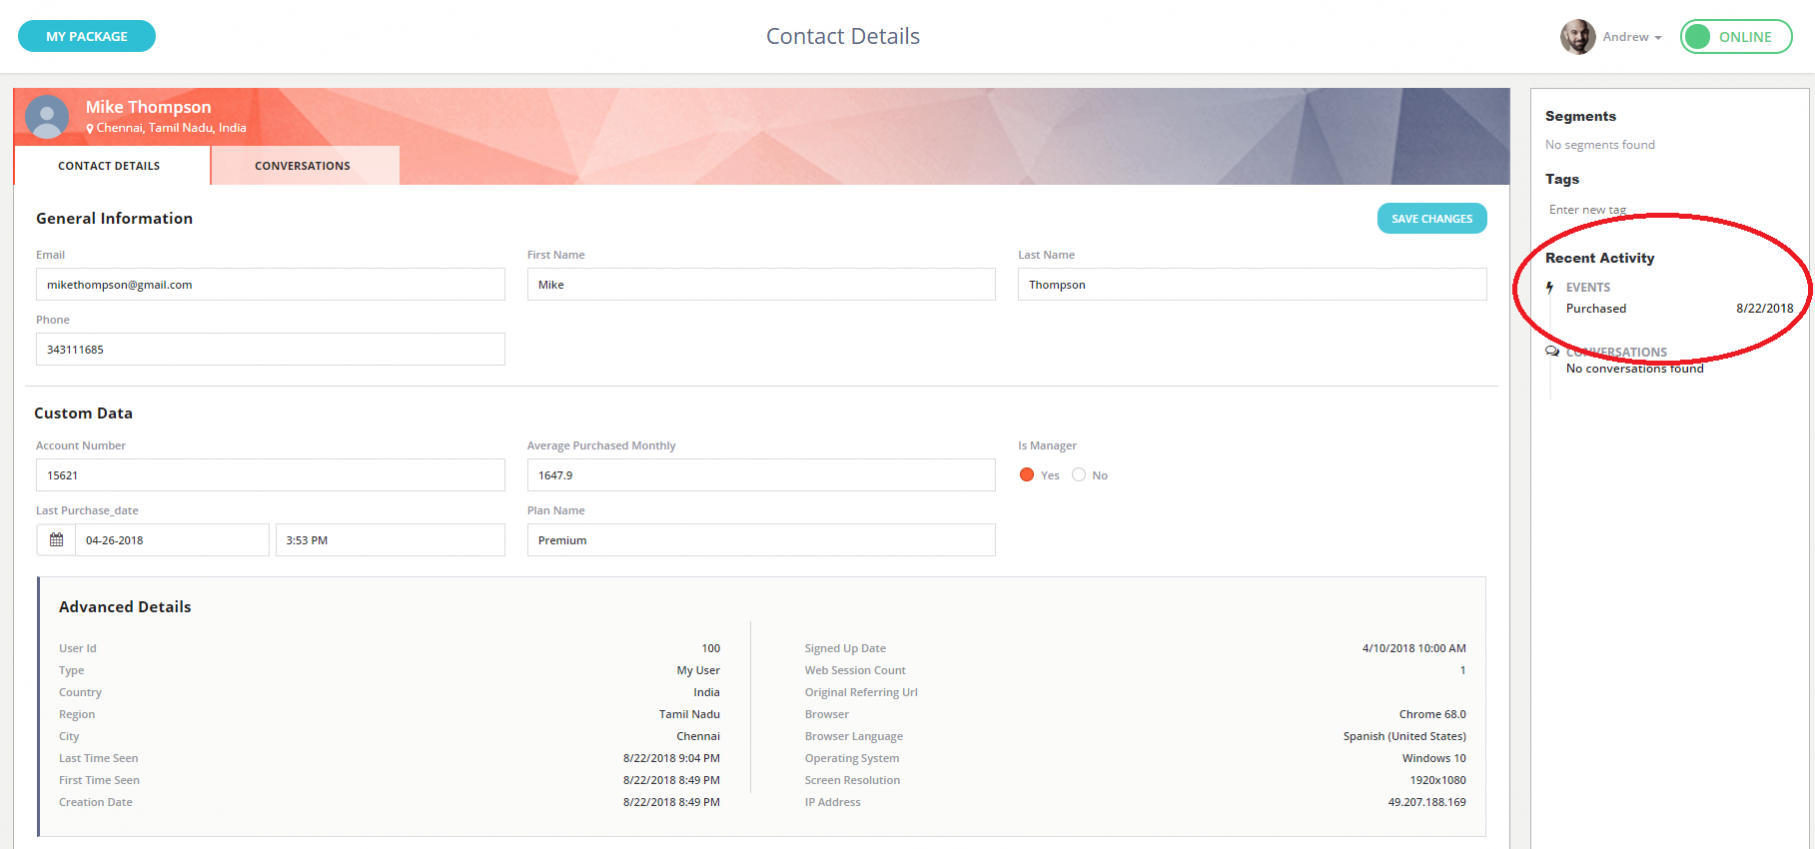
Once you have added the attributes, you will be able to view them by clicking Contacts from the left hand menu.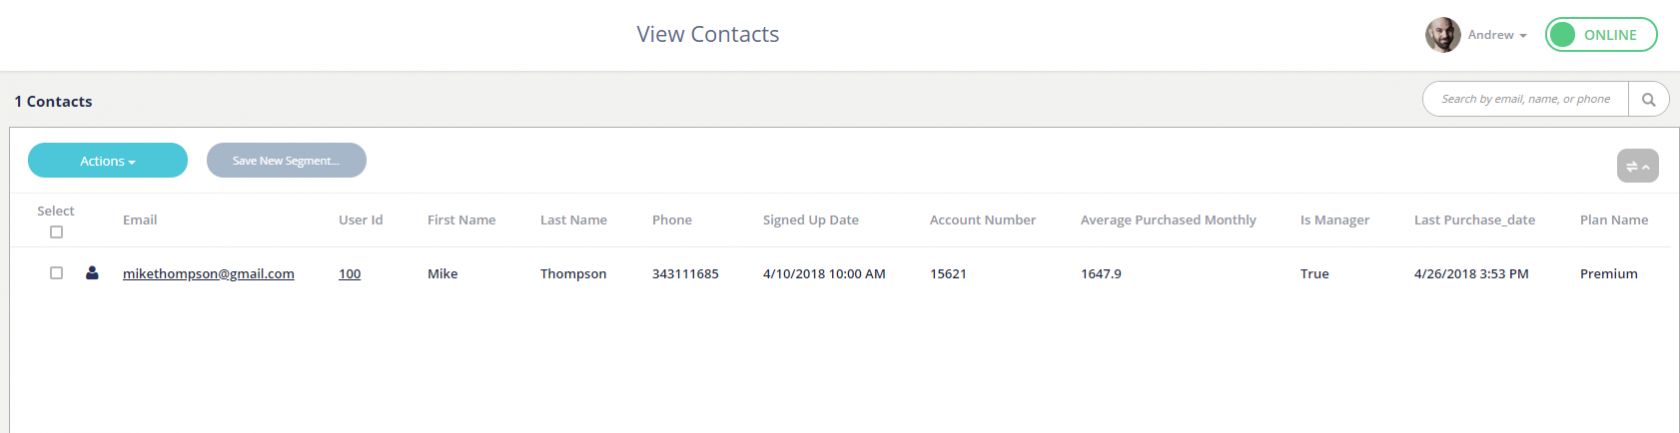
First things first: when using the JavaScript API, we highly recommend enabling Secure Mode to maintain the integrity of your data, and ensure that any calls to Formilla are coming from you, and not being impersonated by someone else.
Formilla.contactCustomAttributes = {
   ...
   "Number of Purchases": 10
};
Note: it can take a few minutes for new contact attributes to appear in your Formilla account. Today you can create up to 100 Contact Custom Attributes in your Formilla account.
In some cases, you might need to remove the value from a custom attribute for a logged-in user. You can do this by passing null as the custom attribute value as shown below:
Formilla.contactCustomAttributes = {
   ...
   "Number of Purchases": null
};
Note: keep in mind that you cannot create new custom attributes with an initial value of null. A value of null can only be used if the custom attribute was already created previously.
If you’re sending automatic emails (via Edge) to customers and you need to unsubscribe them from receiving new emails going forward, you can do that by including the IsUnsubscribed contact attribute in your Formilla code snippet as follows:
// Contact attributes
Formilla.contactAttributes = {
	UserId: "100",
	Email: "[email protected]",
	FirstName: "Mike",
	LastName: "Thompson",
	Phone: "343111685",
	SignedUp_date: 1523354400
	IsUnsubscribed: true	          // Boolean
};
In the same way, in case you need to resubscribe a contact instead, simply pass IsUnsubscribed: false.
Note: you can also unsubscribe/resubscribe a contact manually from your Formilla account by going to Contacts from the left menu, then search and click the contact from the list. On the next page, you’ll see the Unsubscribe/Resubscribe link above the email address input.
What is an Event? An event is basically any activity that is performed on your website. This can include things like, product purchase, add to cart, click on specific page/product, among others.
If you then want to send any interesting activity performed by users in your app to Formilla, then the Events is the right way to go.
Let’s see an example!
Imagine you’d like to track each time a user completes a purchase on your store, then you can fire the following line of code after the logged-in user has finished purchasing:
Formilla.PostEvent("Purchased");
You can pass custom data with events via Event Custom Attributes. Continuing with the example above, we might want to know what product the user purchased, the quantity and the total amount of the purchase. You can accomplish this as follows:
var eventCustomAttributes = {
    "Product": "Laptop Lenovo Y700",
    "Quantity": 1,
    "Total": 989.00
};

Formilla.PostEvent("Purchased", eventCustomAttributes);
You also have the ability to add a success and an error callback when posting events. This way, you can perform additional processing on your end based on the request result, if necessary.
var eventCustomAttributes = {
    "Product": "Laptop Lenovo Y700",
    "Quantity": 1,
    "Total": 989.00
};

var success = function() {
    console.log("FormillaPostEvent - Success");
    // ...
};

var error = function() {
    console.log("FormillaPostEvent - Error");
    // ...
};

Formilla.PostEvent("Purchased", eventCustomAttributes, success, error);
Finally, you can view the most recent Events for a specific contact in your Formilla account by going to Contacts in the left menu, then click a contact to view the details. On the next page, you’ll see the events in the right-rail under the Recent Activity -> Events section.